Azure Spring Cloud - Simple Micro Service
This post is aimed at helping you get started quickly with Azure Spring Cloud
STEP 1
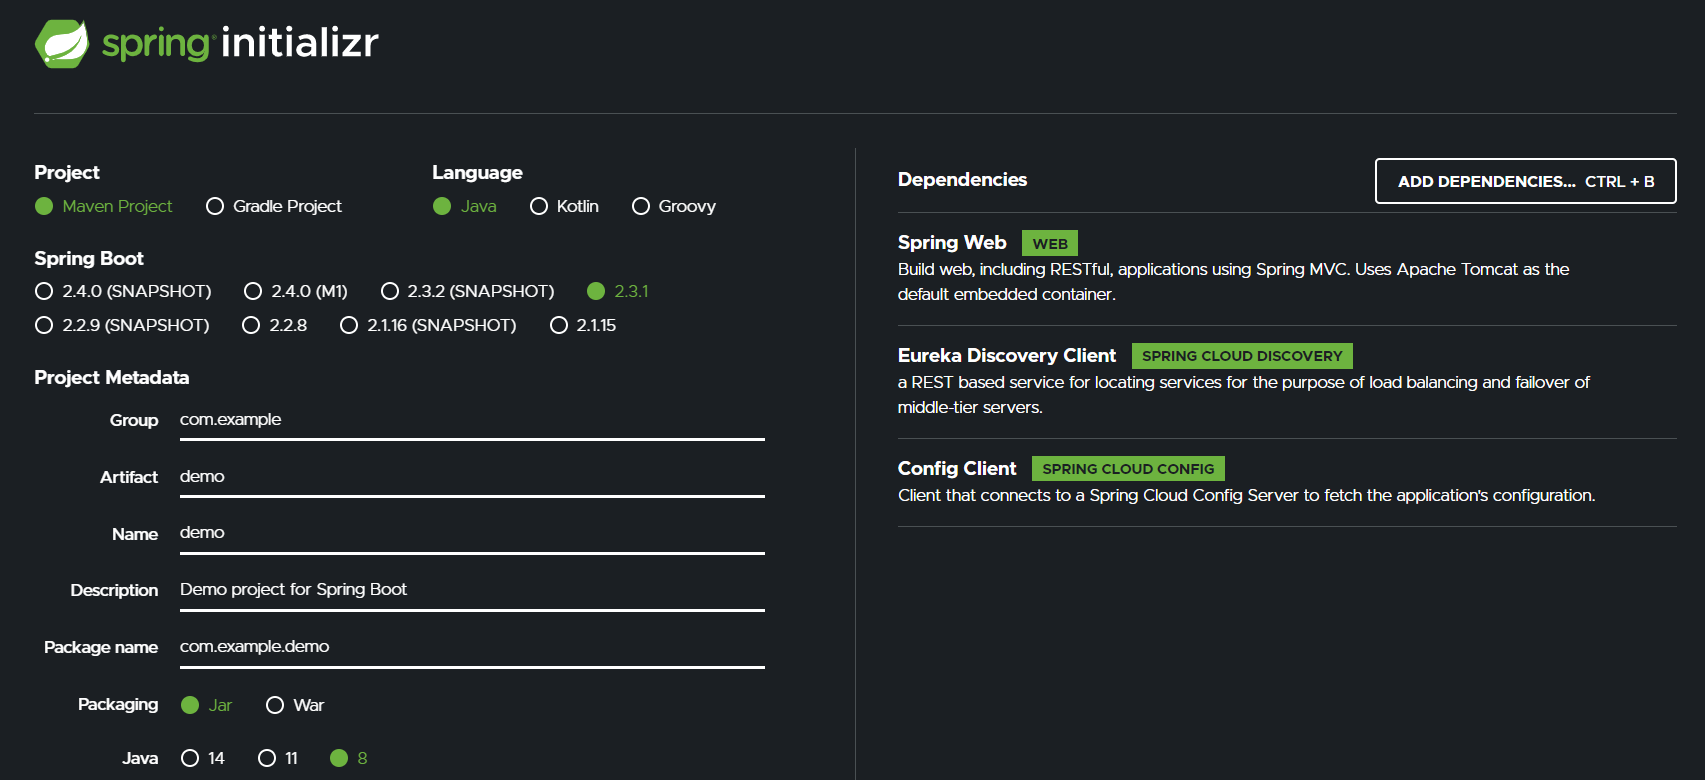
Create a new Spring Boot Project with the following dependencies:
- Spring Web
- Eureka Discovery Client
- Config Client
You can use Spring initializr to get the boilerplate code.

Extract the zip file downloaded and import the project using your favourite IDE.
STEP 2
Let’s add some code!
Here, we will use a REST Controller to read an Environment Variable and return it.
Sample Code:
package com.example.demo;

import org.springframework.beans.factory.annotation.Value;
import org.springframework.web.bind.annotation.GetMapping;
import org.springframework.web.bind.annotation.RestController;

@RestController
public class HelloController {

	@Value("${NAME}")
	String name;

	@GetMapping("/")
	public String test() {
		return "You are doing great, " + name;
	}

}
STEP 3
To keep things simple, we will set the Environment Variable from the command-line and test our application. On Azure Spring Cloud, we will make use of a Config Server.
Let’s test our application!
Run the following commands in your terminal:
set NAME=Gaurav
mvn clean package
Ignore the errors related to Eureka for now. This is because we are not running any Eureka Server on the local system:
ERROR 19932 — [nfoReplicator-0] c.n.d.s.t.d.RedirectingEurekaHttpClient : Request execution error. endpoint=DefaultEndpoint{ serviceUrl=’http://localhost:8761/eureka/}
Start the Spring Boot application:
mvn spring-boot:run

In order to make it Azure Spring Cloud ready, we need to make use of the Maven profile we added earlier via:
mvn clean package -DskipTests -Pcloud
STEP 4
Let’s create a new Spring Cloud App!
- Create a new Azure Spring Cloud Instance:
az spring-cloud create --name
                       --resource-group
                       [--app-insights]
                       [--app-insights-key]
                       [--disable-distributed-tracing {false, true}]
                       [--location]
                       [--no-wait]
                       [--sku]
                       [--tags]

Required Parameters
--name -n
Name of Azure Spring Cloud.

--resource-group -g
Name of resource group. You can configure the default group using az configure --defaults group=<name>.
- Create a new Spring Cloud App:
Configure default Resource Group and Azure Spring Cloud Instance:
az configure --defaults group=$AZ_RESOURCE_GROUP
az configure --defaults spring-cloud=$AZ_SPRING_CLOUD_NAME
Create a new App called mymicroservice
az spring-cloud app create -n mymicroservice
Command group 'spring-cloud' is in preview. It may be changed/removed in a future release.
[1/4] Creating app with name 'mymicroservice'
[2/4] Creating default deployment with name 'default'
[3/4] Setting default deployment to production
[4/4] Updating app 'mymicroservice' (this operation can take a while to complete)
App create succeeded
STEP 5
Before we deploy our application, let us create a Config Server to expose the NAME Environment Variable.
- Go to GitHub and create a new public repository called config (you can specify any name)
- Create a new file in the repository called application.properties
- Add a key-value pair for NAME=from Github in application.properties

If you have configured the Config Server before, you can reset it using:
az spring-cloud config-server clear -n gaukspringcloud
Let’s configure our Config Server with the Git Repository now:
Arguments
    --name -n       [Required] : Name of Azure Spring Cloud.
    --uri           [Required] : Uri of the added config.
az spring-cloud config-server git set -n gaukspringcloud --uri https://github.com/gkgaurav31/config
You can verify if the Config Server has been set to the correct endpoint using:
az spring-cloud config-server show -n gaukspringcloud
Config Server is a cerntralized place to keep all your configuration files. It will be shared amongst all the Apps that you create in Azure Spring Cloud.
We are now ready to deploy our application!
STEP 6
We can deploy our application in two ways:
- Deploy the JAR file
- Deploy using Source Code
Let’s use the JAR file deployment:
az spring-cloud app deploy -n mymicroservice --jar-path target\demo-0.0.1-SNAPSHOT.jar
Command group 'spring-cloud' is in preview. It may be changed/removed in a future release.
This command usually takes minutes to run. Add '--verbose' parameter if needed.
[1/3] Requesting for upload URL
[2/3] Uploading package to blob
[3/3] Updating deployment in app 'mymicroservice' (this operation can take a while to complete)
Deployment using source code is straight-forward. Use the following command the project root:
az spring-cloud app deploy -n mymicroservice
If you see the following exception during deployment, try to remove/rename mvnw script in your workspace:
Pivotal Build System Buildpack 1.0.97
  fork/exec /workspace/mvnw: permission denied
STEP 7
Our app is ready to run!
By default, we do not get a public endpoint to access our application. We can configure a public endpoint while creating our App or after it gets created using –is-public parameter: REFER
Here, we will access our app using a private link.
Get the test-endpoint:
az spring-cloud test-endpoint list -n gaukspringcloud --app mymicroservice
This will return a JSON. Copy the URL in the value for the key: primaryTestEndpoint and use it to access the App:
curl https://primary:<key>@gaukspringcloud.test.azuremicroservices.io/mymicroservice/default/
You are doing great, from GitHub
We have successfully created a simple microservice which makes use of Config Server on Azure Spring Cloud! ![]()
![]() NOTE:
NOTE:
If you update the Config Server now, you will need to restart the App as well.
az spring-cloud app restart -n mymicroservice
We can use polling to check for any changes in the Config Server which will avoid having to restart our App. I will cover this in my next post.